Building a Face Rig - Part 2
Scripting the Face Controller
Now that we have this great controller we build in part one.
We also have a model with blendShapes for facial expressions, build in parts.
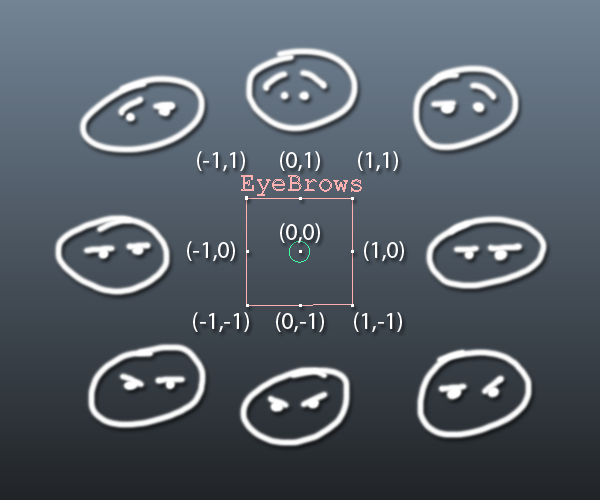
As an example, let's build an eye-brow controller. The aim is this:
- When the controller moves up, the eyebrows go up
- When the controller moves down, so do the eyebrows
- When the controller moves side to side. the eyebrow on the side the controller is not moved to, goes back to neutral position

Let's start with moving left eyebrow up.
Our model has a blendShape deformer called BlendMyFace.
There are three ways to drive the blendshape: set driven keys, direct connections in a node network, or an expression. We will use the latter.
Creating the expression
- Open the (Windows > Animation Editors >) Shape Editor
- Right click on the channel you want to drive with the expression, in this case BrowL_Up, and select Create New Expression
How to edit expressions can be found in the Maya Help.
We want to have the Eyebrow go up as the controller goes up, assuming our controller is called EyeBrowsCTRL this would be:
BlendMyFace.BrowR_up = EyeBrowsCTRL.translateY;
But then the weight for that blendshape becomes negative as we move it down to -1. We need to cut off everything below zero. The clamp function does excatly that, limit the a value between a low and high value: clamp(low, high, variable):
BlendMyFace.BrowR_up = clamp(0, 1, EyeBrowsCTRL.translateY);
Now we need to fade that blendshape out as the cortoller is moved to the right, when the x translation goes to 1. If we subtract the X translation from the Y translation, we get exactly that:
BlendMyFace.BrowR_up = clamp(0, 1, EyeBrowsCTRL.translateY) - clamp(0, 1, EyeBrowsCTRL.translateX);
But unfortunately as the Y translation becomes zero, and the X is one, this yields negative results. A quick and dirty fix is to multiply in stead of substract: zero times one is still zero, where zero minus one becomes negative. We do however now need to inverse translate X (use 1 - translateX):
BlendMyFace.BrowR_up = clamp(0, 1, EyeBrowsCTRL.translateY) * clamp(0, 1, 1 - EyeBrowsCTRL.translateX);
This in not a good solution, as the halfway point where both X and Y are 0.5, the result in 0.25, yielding a non-linear result.
Cleaner is to use subtraction and limit the resulting value, using another clamp:
BlendMyFace.BrowR_up = clamp(0, 1, clamp(0, 1, EyeBrowsCTRL.translateY) - clamp(0, 1, EyeBrowsCTRL.translateX) );
On to the Right Eyebrow. We can add a line to expression to drive it, like this:
BlendMyFace.BrowR_up = clamp(0, 1, clamp(0, 1, EyeBrowsCTRL.translateY) - clamp(0, 1, EyeBrowsCTRL.translateX) );
BlendMyFace.BrowL_up = clamp(0, 1, clamp(0, 1, EyeBrowsCTRL.translateY) - clamp(0, 1, EyeBrowsCTRL.translateX) );
They now get the same value but we want the Right eyebrow to fade out as X becomes negative. That is easy: simply add X in the range (-1, 0):
BlendMyFace.BrowL_up = clamp(0, 1, clamp(0, 1, EyeBrowsCTRL.translateY) + clamp(-1, 0, EyeBrowsCTRL.translateX) );
For the down part, we need to use the (-1,0) range of the Y translation. We can do this by taking the absolute value, using the abs() function to remove the negative sign:
BlendMyFace.BrowR_Dwn = clamp(0, 1, abs( clamp(-1, 0, EyeBrowsCTRL.translateY) ) - clamp(0, 1, EyeBrowsCTRL.translateX) );
BlendMyFace.BrowL_Dwn = clamp(0, 1, abs( clamp(-1, 0, EyeBrowsCTRL.translateY) ) + clamp(-1, 0, EyeBrowsCTRL.translateX) );
And Bob's you uncle!
The entire script:
BlendMyFace.BrowR_up = clamp(0, 1, clamp(0, 1, EyeBrowsCTRL.translateY) - clamp(0, 1, EyeBrowsCTRL.translateX) );
BlendMyFace.BrowL_up = clamp(0, 1, clamp(0, 1, EyeBrowsCTRL.translateY) + clamp(-1, 0, EyeBrowsCTRL.translateX) );
BlendMyFace.BrowR_Dwn = clamp(0, 1, abs( clamp(-1, 0, EyeBrowsCTRL.translateY) ) - clamp(0, 1, EyeBrowsCTRL.translateX) );
BlendMyFace.BrowL_Dwn = clamp(0, 1, abs( clamp(-1, 0, EyeBrowsCTRL.translateY) ) + clamp(-1, 0, EyeBrowsCTRL.translateX) );