Finishing your animation: Editing with Premiere Pro
After months of hard work, you have finally have all the image sequences on disk. So now what? With this page I hope to get you started with the conversions of a bunch of image sequences to a polished, professionally finished animation.
Editing: Adobe Premiere Pro
In Premiere pro you work in a project. This seems similar to Maya, but it is not: the project is saved as one file, not as a directory with many sub directories and multiple scene files. Still, it can contain multiple edits or timelines.
The file-type is Premiere Pro Project (.prproj)
Just like texture images do not become part of your Maya scene but are referenced, the source material (a.k.a. Footage) does not get saved with the project.
Setting up a Project
When premiere starts, you get the Welcome to Adobe Premiere screen. If you don't have one already, choose New Project.
In the New Project Window choose the correct settings (most of these can actually be changed later)
- Action and Title Safe: keep defaults
- Video - Display Format: Timecode or Frames
- Audio -Display Format: Audio Samples
- Capture - We are not going to capture anything, just importing
- Location: set this to your own drive, to the appropriate directory
- Name: "My Brilliant New Animation"
The interface
The Adobe Premiere Pro Workspace (at Media College.com)
Importing Images
Note: Premiere Pro does not read Maya iff images - render to Tiff or Targa in stead!
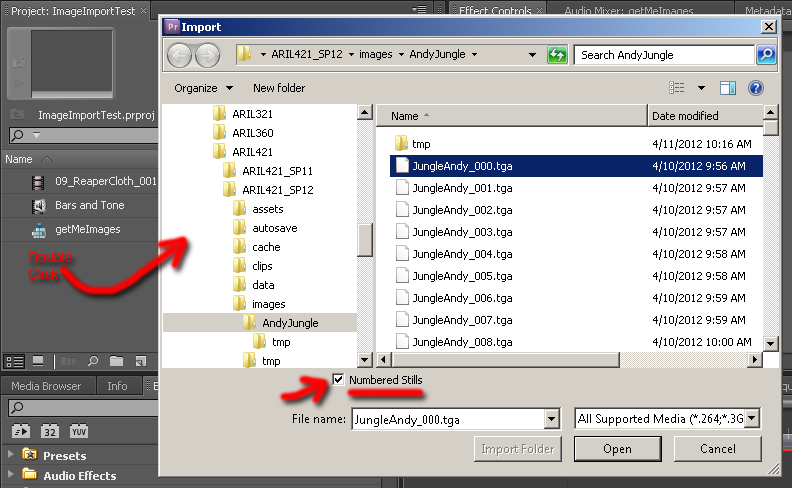
Double Clicking in an empty area of the project window will bring up a file requester (File > Import... or CTRL-i)

Select the first image of your sequence, check Numbered Stills and hit Open.
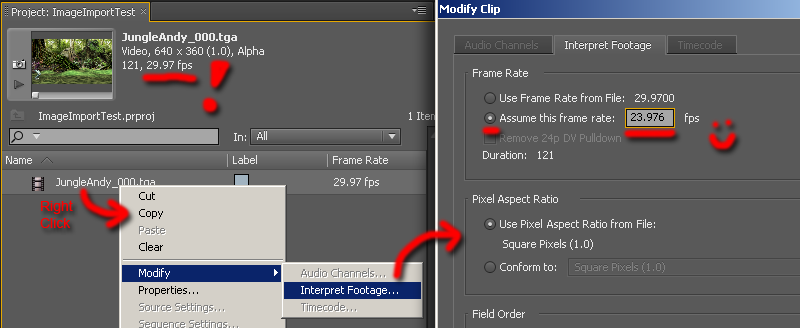
You have to make sure the images are imported at the right frame rate:

If the frame rate is off, right click on the footage in the project window and select Modify > Interpret Footage. In the Modify Clip window that pops up, check Assume this frame rate: and type in 23.976 (Assuming you animated at 24 fps - the number is slightly lower because of the video rate being "drop frame" but don't worry about it).
 Create a sequence
You need a sequence to edit on. By dragging (one of) your images sequence onto the new item icon, a sequence will be created with the same settings as your image sequence. You may also create a new sequence by clicking on the new item icon and selecting Sequence.... You can use these settings:
- Sequence Presets - HDV - HDV 720p24 works well
- Please note: the HDV 1080p24 preset uses non square pixels. If you want to work in 1080p, choose HDV 1080p24 but then you need to go to the General tab, and:
- switch the Editing Mode to Desktop,
- set the Frame Size to 1920x1080 and
- set the Pixel Aspect Ratio to Square Pixels (1.0)
 Basic Editing
As with most programs, there are many ways to get similar result. Here is a very basic way to edit, that is: to get your image sequences onto your timeline in the right order with some minor adjustments.
To add image sequences to the timeline, simply drag and drop (with the Left Mouse Button or LMB pressed) from the project window onto a video track in the timeline, usually starting with video1 (see image on the right).
 By default the selection tool (v) is active, we can use this tool to perform most basic editing tasks:
- You can move the clip by dragging with the LMB pressed
- If you hover over the start or end, your curson will change into a square bracket: [ or ]. Click here and you can crop your clip (cutting of some of the beginning or end frames) by dragging with the LMB pressed
 As long as Snap is active, your clips will, well, snap together. When adjusting in and out points snap will prevent you from cutting of just a few frames, as it will then snap to the beginning / end of the clip. Click on the magnet item in the timeline window to turn snap on and off.
Exporting your movie
Once you have all the clips on your timeline, added titles, sound and all, you want to export your movie
Select the timeline window with the right sequence active (or the sequence in the project window) and go to File > Export > Media.
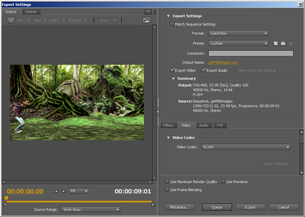
 The export settings window that pops up can be pretty intimidating. You can export using the H264 codec with either the QuickTime or MP4 container.
To export to a QuickTime Movie:

- Select Format QuickTime
- A little below it and easy to miss is the Output Name: click on the name to change where and under what name the exported movie will be saved
- The default presets are limited to SD, so you have to go to the Video tab
- For Video Codec choose H.264
- Under it you can fine the Basic Settings and the quality should be set to 100%
- You do need to adjust the image size (the image on the right show 640x480, which is NOT what you should have been rendering at) to 1280 by 720 (width / height)
- The Frame Rate should be OK at 23.976
- The Aspect needs to be set to Square Pixels
- Below the preview on the right of the Export settings window by default is says Source Range: Work Area. Normally this would be correct as the work area adjusts to fit the length of the sequence. To make sure your entire edit gets exported, choose Entire Sequence