The hardware simulator code and your operating system code combine to form the simulation program. However, it’s easier to understand the simulation program if the hardware and operating system code are thought of as being separate parts of the simulation program. As with a real computing system, the connection between the hardware and the operating system occurs at the interrupt handlers.
Unlike a real computing system, however, the operating system in the simulation program does not run on the hardware it controls. The operating system executes as native Java code, while user processes execute on the simulated hardware. This may be a bit confusing at first, particularly for those that have written native operating systems, but this approach is much simpler than writing a native operating system, and the fundamental concepts used in each are the same.
Files related to the simulator can be found under the /export/home/class/mucsos/pai
project directory, where i is the assignment number, 1 ≤ i ≤ 5. The
project directory should be accessible from most Monmouth University machines.
The simulator jar contains all the code needed to build a simulator, including
main(). To run the simulator, type
java -cp /export/home/class/mucsos/pai/arcsim.jar:. main yourOS batchDiskName
where i is the assignment number 1 ≤ i ≤ 5, yourOS is the name of
the class implementing the OperatingSystem interface, and
batchDiskName is the name of a batch disk.
pa1-solo batch disk with the operating system
defined by the os class, use the command
java -cp /export/home/class/mucsos/pai/arcsim.jar:. main os pa1-solo
The simulator is written in Java version 8. The simulator jar should be backwards compatible with earlier versions of Java (I have not tested this), but upgrading to version 8 is a good idea.
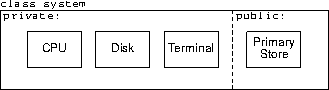
The simulator comprises many classes, but five constituent classes are the most important. Four of the important classes correspond to the four pieces of the hardware architecture: CPU, Primary Store, Disk, and Terminal. The fifth class, the Hardware-Architecture class, corresponds to the complete hardware architecture.
The Hardware interface extends the PrimaryStore interface; the remaining three classes are represented as private instances and cannot be directly accessed from outside the class implementing the Hardware interface. The private members of the Hardware class are accessed indirectly through Primary Store, as described in various sections of the hardware architecture description.
The simulator creates a single of instance of the class implementing the
Hardware interface. The system class has three public members: its
constructor, an initialize-and-execute routine, and a pointer to an object of
type class memory. The first two public members should not be accessed by
operating system code; only the pointer to memory is properly a public member.
The PrimarayStore interface defines the fetch() and store() methods
to read and write Primary Store. There are a few other public members
available to help simplify code; see PrimaryStore.java in the class
directory for details.
The Hardware interface Hardware.java defines a number of named constants
that act as parameters for the hardware architecture; such parameters include
Primary Store size, the way Primary Store’s partitioned into System,
User, and Device Space, and so on. See Hardware.java in the class
directory for details. The actual value of the named constants may change at
any time; it is important that your code use the named constants and not the
actual values.
void interrupt(Hardware.Interrupt i)
passing in the identifying code for the interrupt. Your code takes over, and
what happens after that is entirely up to you. When your interrupt handler
returns, either by a return statement or by falling off the end of the
interrupt handler, the simulator resumes executing the user process.
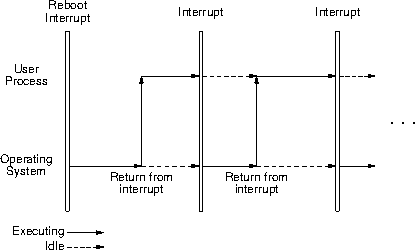
This see-sawing between the user process and the operating system continues until there are no more user processes to execute, at which point the operating system halts the system.
The interrupts that occur may or may not be a result of the executing user process. If the user process makes a system call, then it will generate a system-call interrupt. If, however, the operating system starts a disk read to bring in the next user program, then the resulting disk-io interrupt has nothing to do with the executing user process.
When the simulator starts, it callsOperatingSystem.interrupt() with the
identifying code for a reboot interrupt.
The simulator and my implementation of the operating system were developed using Java version 8. Relying on backward compatibility, it should be possible to implement the assignments with an earlier Java version, but it’s probably best to upgrade to (or install) the most recent JDK.
To compile file.java, use the command
javac -cp /export/home/class/mucsos/pai/arcsim.jar:. other-options file.java
where i is the assignment number, 1 ≤ i ≤ 5. For
example, to compile the Java file scheduler.java, use the command
$ javac -cp /export/home/class/mucsos/pai/arcsim.jar:. -Xlint scheduler.java

$
-Xlint is a javac option that checks for legal but questionable code.
As a convenience, the simulator defines two printing methods suitable for debugging: an unconditional panic printer and a conditional debug-message printer.
panic()
was called and kills the simulator. The method signature is
panic(String fmt, Object... values)
fmt is a String.format()-style format spec and values
is a sequence of objects used to provide values to the format spec. As an
example, when the panic statement
if (top < bottom)
  SystemSim.panic("Process top %d is less than bottom %d.\n", top, bottom);
is executed, it produces the output
$ java -ea -cp arcsim.jar:. main os pa1-solo
?! Internal error:
?! Process top 288 is less than bottom 320.

  os$ProgramLoadInterruptHandler.handleInterrupt  os.java        401
                              os.interrupt        os.java        153
                             Cpu.triggerInterrupt Cpu.java       668
                     SystemSim$1.run              SystemSim.java 100

$
SystemSim.dmsg.print() method conditionally prints debugging messages to std-err. The
advantage to using SystemSim.dmsg.print() over printing to std-err is that you can use the
-d option on the simulator command line to control which SystemSim.dmsg.print() calls
produce output.
The SystemSim.dmsg.print() signature is
void print(String flag, String fmt, Object... values)
where flag determines whether the print() call produces output,
fmt is the message printed given as a String.format()-style
format spec and values is a sequence of objects providing values for the
format spec.
SystemSim.dmsg.print() call produces output only if flag appears as part of a -d
option on the simulator command line. For example, the print() call
SystemSim.dmsg.print("interrupts",
  "tick %4d:  %s interrupt raised.%n", clock, Hardware.Interrupt.reboot);
produces output if the flag interrupts appeared as part of a -d
option on the simulator command line; if interrupts didn’t appear
as part of a -d option, then the print() call produces no output.
isFlagged() method to test if a flag was given in the
-d simulator option. The method signature is
String isFlagged(String... flag)
isFlagged() intersects the flags given as arguments with the flag set given
in the -d simulator command-line option. If the intersection is
non-empty, isFlagged() returns an arbitrary flag in the intersection. If
the intersection is empty, isFlagged() returns the empty string "".
if (SystemSim.dmsg.isFlagged("syscall").equals("syscall") ) {
  // Complicated output about system calls.
  }
The SystemSim.dmsg.raiseFlags(String... flags) method replaces the current raised-flag
set with the flag set given in the argument list. The initial value of the
raised-flag set is either the flags given in the -d simulator command-line
option or the empty set if -d wasn’t given.
java -cp /export/home/class/mucsos/pai/arcsim.jar:. \
    main [options] osClass batchDisk [terminalInput]
where
options is an optional list of command-line options. Note that
the options should be given after main on the simulator command-line.osClass is the name of the class implementing the OperatingSystem
interface.batchDisk is the name of the .dsk file the operating system
should use for the disk.terminalInput is the name of the optional
.tty file the operating system should use for terminal input.
$ java -cp /export/home/class/mucsos/pai/arcsim.jar:. \
    main os /export/home/class/mucsos/pa1/pa1-empty.dsk

The system is halted.
Total execution time:  10 ticks, idle time: 9 ticks (90%).

$
The .dsk extension may be omitted:
$ java -cp /export/home/class/mucsos/pai/arcsim.jar:. \
    main os /export/home/class/mucsos/pa1/pa1-empty

The system is halted.
Total execution time:  10 ticks, idle time: 9 ticks (90%).

$
If the programs on the batch disk do terminal I-O, the simulator command-line should also contain a terminal-input file. For example
$ java -cp /export/home/class/mucsos/pai/arcsim.jar:. \
    main os.class /export/home/class/mucsos/pa2/pa2-ttycopy.dsk \
    /export/home/class/mucsos/pa2/pa2-ttycopy.tty

The system is halted.
Total execution time:  2653 ticks, idle time: 785 ticks (29%).

$
The .tty extension may be omitted. If the terminal-input file has
the same name as the batch disk, the terminal-input filename may be omitted,
and the simulator will automatically open it:
$ java -cp /export/home/class/mucsos/pai/arcsim.jar:. \
    main os.class /export/home/class/mucsos/pa2/pa2-ttycopy.dsk

The system is halted.
Total execution time:  2653 ticks, idle time: 785 ticks (29%).

$
The simulator does not change the device simulation files; the same files
may be used repeatedly, independent of the I-O operations performed on the
device. At the end of a simulation, the simulator creates the files
results.dsk and results.tty. The file results.dsk represents
the state of the disk at the end of the simulation; the file results.tty
contains all the data sent to the terminal during the simulation. If a
device is not written to during a simulation, the associated results file is
not created.
-d Simulator Command-Line Option
The -d flag-list command-line option controls which of the SystemSim.dmsg.print()
calls writes messages to std-err. The -d value flag-list is a
comma separated list of debugging-print flags; spaces should not appear in the
list.
If a SystemSim.dmsg.print() call has as its flags argument one of the flags given with
-d, then the call writes the message to std-err, otherwise, the call
produces no output. For example, given
SystemSim.dmsg.print("time", "The time is %d.%n", read_clock());
the command-line option -d time causes the call to write the message to
std-err; the call produces no output if the command-line option -d
doesn’t contain the time flag.
instructionCounts - output instruction counts on system halt.interruptCounts - output interrupt counts on system halt.systemCallCounts - output system-call counts on system halt.| This page last modified on 2015 March 27. |
|
