Operating Systems Project, Fall 2000
Architecture Simulator
Table of Contents
Introduction
This page describes the software used to simulate the hardware architecture
defined for the operating system project. You should be familiar with the
hardware architecture before reading this page.
The hardware simulator code and your operating system code combine to form the
simulation program. However, it's perhaps easier to understand the simulation
program if the hardware and operating system code are separate parts of the
simulation program. As with a real computing system, the connection between
the hardware and the operating system occurs at the interrupt handlers.
Unlike a real computing system, however, the operating system in the simulation
program does not run on the hardware it controls. The operating system
executes as native C++ code, while user processes execute on the simulated
hardware. This may be a bit confusing at first, particularly for those that
have written native operating systems, but this approach is much simpler than
writing a native operating system, and the fundamental concepts used in each
are the same.
Project Directory
Files related to the simulator can be found under the
/export/opt/cs-438-505 project directory, which should be accessible from
any CS Lab machine. I do not think the /export directories are
cross-mounted with other systems, but if they are, you should keep in mind that
object and executable files in the project directory are compiled for
sparc-solaris machines and won't work on, for example, intel-linux or mips-irix
machines.
The subdirectories under the project directory are
include- Contains the
.h files included via the
#include preprocessor directive.
lib- Contains the simulator library
libsim.a. The
simulator library holds all the files needed to build a simulator; typing
g++ -o my-sim /export/opt/cs-438-505/libsim.a
builds a simulator called my-sim (the simulator won't do much because it
contains only the default interrupt handlers, which don't do much).
devices- Contains the files used for simulating the disk and
terminal devices. Files ending in
.dsk are for disks; files ending in
.tty are for terminals. The files associated with programming assignment
i start with pai.
misc- Contains miscellaneous files which may be of interest.
Simulator Implementation Structure
The simulator is built with five C++ classes; four of the classes correspond to
the four pieces of the hardware architecture: CPU, Primary Store, Disk, and
Terminal. The fifth class, the
system class, corresponds to the
complete hardware architecture, and contains one instance of each of the four
hardware architecture pieces.
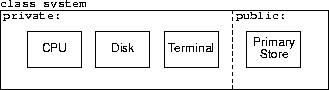
Primary Store is the only public member of the system class; only Primary Store
can be directly accessed from outside the system class. The remaining members
of the system class are private members and cannot be directly accessed from
outside the system class. The private members of the system class are and are
accessed indirectly through Primary Store, as described in various sections of
the hardware architecture description.
The simulator creates a single of instance of the hardware architecture, which
is stored in mass, a global variable of type class system. The
system class has three public members: its constructor, an
initialize-and-execute routine, and a pointer to an object of type class
memory. The first two public members should not be accessed by operating
system code; only the pointer to memory is properly a public member. See
system.h for details.
The memory class defines the fetch() and store() public member
functions to read and write Primary Store. There are a few other public
members available to help simplify code; see memory.h for details.
The include file system.h also defines a number of named constants that
act as parameters for the hardware architecture; such parameters include
Primary Store size, the way Primary Store's partitioned into System, User, and
Device Space, and so on. See system.h for details. The actual value of
the named constants may change at any time; it is important that your code use
the named constants and not the actual values.
The Simulator-Operating System Interface
As explained above, the interrupt handlers serve
as the interface between the simulator and the operating system code. When an
interrupt occurs, the simulator stops executing the user process and calls the
the associated interrupt handler that you've provided. Your code takes over,
and what happens after that is entirely up to you. When your interrupt handler
returns, either by a return statement or by falling off the end of the
interrupt handler, the simulator resumes executing the user process.
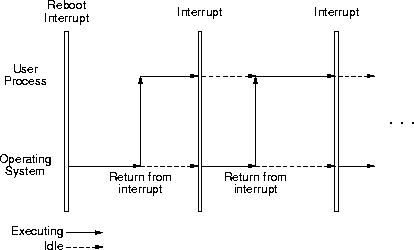
This see-sawing between the user process and the operating system continues
until there are no more user processes to execute, at which point the operating
system halts the system.
The interrupts that occur may or may not be a result of the executing user
process. If the user process makes a system call, then it will generate a
system-call interrupt. If, however, the operating system starts a disk read to
bring in the next user program, then the resulting disk-io interrupt has
nothing to do with the executing user process.
When the simulator starts, it installs your reboot interrupt handler in the
interrupt vector and then calls it; your code is responsible for
installing the rest of the interrupt handlers.
Writing the Code
Because the system is represented as a C++ class, you need to write your
operating system in C++. You may use whatever design and implementation
techniques you're comfortable with. You are not required to implement
operating system data structures using Primary Store; for example, the process
table can be a C++ data structure. You are also not required to implement any
of the operating system in Primary Store, although you may find it necessary to
implement tiny helping pieces there.
The simulator and my implementation of the operating system were developed
using the g++ compiler. I've also used the Solaris
/export/opt/SUNWspro/WS6/bin/CC compiler, but CC is much pickier than
is g++ about ANSI-ISO standard compliance, particularly with respect to
name spaces. On the other hand, CC sometimes gives more intelligible
error messages than does g++. The simulator library was compiled using
g++, and I've run into problems using CC to link against a
g++-generated library. I recommend using g++ until I can straighten
out the portability issues.
The debugp() Output Procedure
As a convenience, the simulator defines the debugp() output procedure for printing
debugging messages to std-err. The advantage to using debugp() over printing
to std::cerr) is that you can use the -D option on the simulator
command line to control which debugp() calls generate output.
The debugp() prototype is
void debugp(int flags, const char * fmt, . . .)
Except for the integer flags argument, debugp() is similar to the
printf() statement in Unix.
The integer flags argument determines whether a particular debugp() call will
result in output. There are 32 flags, named dgp_f00 through dbp_f31,
defined in utils.h. A debugp() call produces output only if one of the flags
given in its flags argument appears as part of a -D option on the
simulator command line. For example, the debugp() call
debugp(dbp_f29, "The time is %d.\n", read_clock());
would produce output if the flag dbp_f29 appeared as part of a -D
option on the simulator command line; if the flag dbp_f29 didn't appear as
part of a -D option, then the debugp() call would produce no output.
Individual flags can be combined using addition (+) or bit-wise or
(|). For example, the debugp() call
debugp(dbp_f29 | dbp_f20, "The time is %d.\n", read_clock());
would produce output if either dbp_f29 or dbp_f20 appeared in a
-D option.
The simulator uses some of the flags in its own debugging output statements.
The simulator started with flag dbp_f00 and allocates sequentially higher
flags. To avoid conflicts over flag use, your operating system should start
with flag dbp_f31 and allocate sequentially lower flags. See utils.h
for details. (The simulator also defines the flags to have meaningful names;
unfortunately, other flag users are stuck with the dbp_f names.)
The remaining arguments to debugp() are similar to the arguments in printf.
There are differences, however, between the formatting specifiers used in debugp()
and printf(): debugp() recognizes fewer specifiers than does printf(),
the debugp() formatting specifiers are simpler than they are printf() and
debugp() re-interprets some of the common specifiers an a way differently than
does printf().
The formatting specifiers recognized by debugp() are
c - Print a character.
d - Print a decimal integer.
s - Print a string; this is not a char * string but a
<string> string. The value corresponding to a %s format
specifier should be a pointer to the string; for example
debugp(dbp_f30, "name: %s.\n", &str);
If you try to pass a string, you'll get a compilation error.
x - Print a hexadecimal integer.
% - Print a %.
Other options are available upon request.
The debugp() formatting specifier is just the character % followed by one of
the characters given in the previous table. For example, the formatting
specifier %d would print a decimal integer. The field width, pad
character, justification, and other options that can be specified in the
formatting specifiers used by printf() are not recognized by debugp().
Building a Simulator
Once your code compiles, you can combine your code with the simulator code
using a command of the form
g++ your-options-here your-files-here /export/opt/cs-438-505/libsim.a
The simulator library should appear after the list of your files; g++ tries
to resolve all undefined names when it encounters a library, and if the
simulator library appears before some of your files, g++ may use the
default code given in the library rather than the code given in your files.
Your-files-here is a list of the files containing your operating-system
implementation. You should have at least one file, and may have as many files
as you feel necessary. If you're building simulators by hand - that is,
without a make file - you should list the source versions (the .cc
versions) of your files; this insures that your object files are created using
the most recent versions of the simulator. If you build your simulator using a
make file, and you've got the compilation dependencies set correctly, you can
use the object versions (the .o versions) of your files.
Using a make file is simpler and saves you some time because it avoids
unnecessary compilations. However, if you get the compilation dependencies
wrong, you could build a simulator using obsolete code. Compiling by hand is
slower, because you're always recompiling everything every time, but it makes
sure you're creating a simulator using up-to-date code. The miscellaneous
project directory contains an example make file you can adapt to build your
simulator.
Your-options-here is a list of g++ options. See the gcc man
page (there is no g++ man page) for a full list of options; two important
options are
-g- Include extra debugging information, such as source-code
lines, to the executable. You can debug your code without using the
-g
option, but the debugger won't have access to all the information it would have
had had -g been used. If you are creating object files, they too must be
compiled with -g to provide extra information; the files in the simulation
library have been compiled with -g.
-I/export/opt/cs-438-500/include- Tell
g++ the location of
the simulator include files. The -I option is needed only when compiling
.cc files.
Running the Simulator
If your simulator is called my-sim, you can run it by typing my-sim
(if you get an error message like my-sim: not found, try typing
./my-sim).
By default, the simulator looks in its current directory for the disk
simulation file dsk and the terminal simulation file tty. You can
use the -d dfile and -t tfile simulator options to use the
file named dfile as the disk simulation file and the file named
tfile as the terminal simulation file. The simulator only opens a
device simulation file if the device is actually used during a simulation.
The simulator does not change the device simulation files; the same files may
be used repeatedly, independent of the i-o operations performed on the device.
At the end of a simulation, the simulator creates the files results.dsk
and results.tty. The file results.dsk represents the state of the
disk at the end of the simulation; the file results.tty contains all the
data sent to the terminal during the simulation. If a device is not written to
during a simulation, the associated results file is not created.
The -Dflag-list command-line option controls which of the debugp() calls
writes output to std-err. The argument flag-list is a comma
separated list of debuging-print flags; spaces should not appear in the list.
As a convenience, the dbp_ prefix may be dropped from the flags appearing
in flag-list; -Df10,f20 is equivalent to -Ddbp_f10,dpb_f20.
If a debugp() call includes one of the listed flags in its flags argument,
then it will write to std-err, otherwise, it produces no output. For
example, given the debugp() call
debugp(dbp_f17 | dbp_f23, "The time is %d.\n", read_clock);
The command-line options -Df23 and -Df17 would cause the call to
produce output, while -Df30 would not.
The simulator defines some flags, which you may find useful:
disk-io - output disk i-o information.
tty-io - output terminal i-o information.
ins-cnts - output instruction counts on system halt.
intr - output interrupt information.
These flags may be mixed with the dbp_ flags in a -D option.
This page last modified on 21 November 2000.